Step 1
Install IPTV Smarters Pro on Smart TV (Samsung / LG)
Step 2
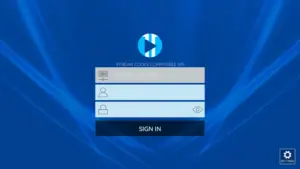
Enter your information
There are 4 sections you need to fill your information in:
- Any name : you can enter any name
- Username : Enter username of your line (login on Email to find your password)
- Password : Enter the password of your line
- Port : http://testtest.80
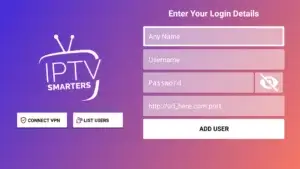
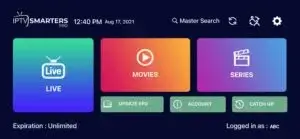
After that, you need to click on Add user and wait a few minutes to load the channel.
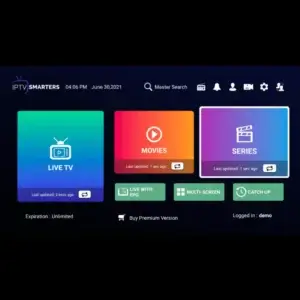
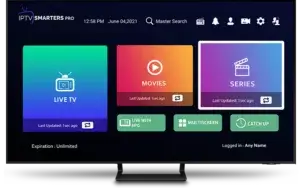
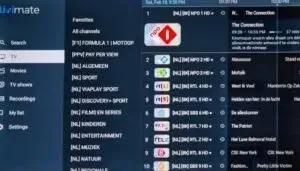
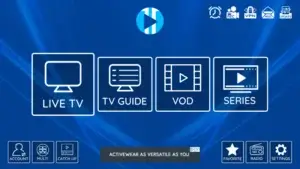
Now you can click on the Live TV section to see the channel list. Next, you can select any channel, and then start watching.
Note : IPTV Smarters player app is compatible with many devices such as Android device, iOS device, and PC.
Can't quite figure it out? Please feel free to contact us.
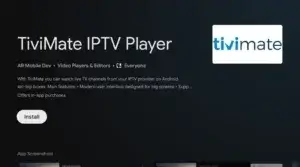
Android TV / Box / Chromecast
TiviMate is the best IPTV player for Android TV/System. It is easy to install and convenient to use.
Important features :
- Modern interface that is customizable
- EPG Support
- Fast zapping
- Review function
- Watch multiple screens at the same time
- Subtitles customizable
- Audio stream customizable
- Xtream code login
- ParentControl
Install TiviMate
Step 1
Get the app from the App Store
Step 2
Open the app
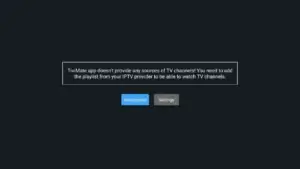
Go directly to add playlist and choose the Xtream Codes login function.
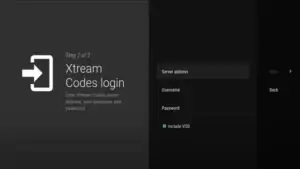
Step 3
Add Xtreme Codes
- Server address : http://line.testtest.80
- Username : XXXXX
- Password : XXXXX
- Check include VOD
Press next and the playlist will be uploaded to TiviMate.
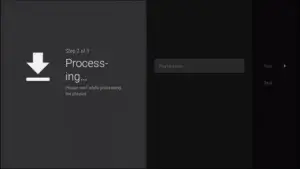
Step 4
Load playlist
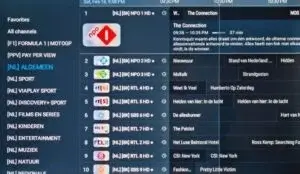
The app indicates exactly how many channels, VOD and films you have received. Press next and the playlist will appear within 30 sec.
Note : A TiviMate premium account is required for some functions (TV guide, zapping, playing movies and series). The costs can be found within the app.
Screenshot of the app
Can't quite figure it out? Please feel free to contact us.
Step 1
Start by downloading the Smarters Player Lite app from the Apple Store using this URL :
https://apps.apple.com/in/app/smarters-player-lite/id1628995509
or you can search for it in the App Store. Install the app on your iOS device.
Step 2
Open the app after downloading and enter the credentials.

Step 3
Enter the login details we provided you after you have taken out a subscription with us. Now click on "ADD USER" to proceed to the next section.
Step 4
Wait for a few seconds.
Step 5
Now click on the "Live TV" icon as shown in the image via a red arrow.
Step 6
Now you need to select the channel group you want to watch and move on to the next section.
Step 7
Now you need to click on the channel name and then double click on the small screen to go to full screen as the last step.
Step 8
To add EPG, you don't need to add an EPG URL. Just click on "Install EPG".
✓ Finished
Can't quite figure it out? Please feel free to contact us.
-
This is an instruction for installing Enigma 2/Linux — you need to install Putty to use it.
Go to : Settings > Setup > System Network Device > Adapter Setup > Settings
Get your IP address (it starts with 192.168…)
- Go to your Windows PC and download Putty software.
- Open Putty.
- Add your IP address of your device.
- Add port 23.
- Click Open.
- Your default login and password are root.
-
Copy your rule (you will get it after you order your plan) :
wget -O /etc/enigma2/iptv.sh "your m3u link" && chmod 777 /etc/enigma2/iptv.sh && /etc/enigma2/iptv.sh
- RIGHT CLICK after entering your rule, then press ENTER.
- Type restart — your device will restart.
Can't quite figure it out? Please feel free to contact us.
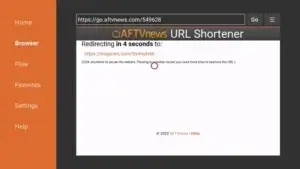
How to Install TiviMate on Firestick
Step 1
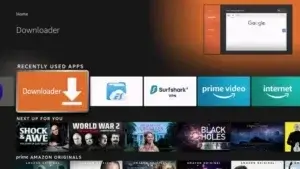
Install the Downloader app from your respective App Store (Amazon App Store or Google Play) and enable Unknown Sources in your streaming device settings.
If you haven't already, check out the following screenshot tutorial for step-by-step instructions.
Step 2
Launch Downloader.
Step 3
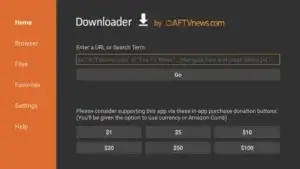
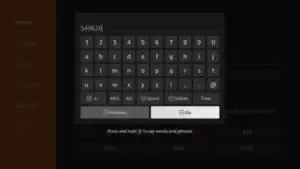
Hover over the URL bar and click the select button on your remote control to open the keyboard.
Step 4
Enter the download code for TiviMate, which is 549628, and click Start.
Step 5
You will then see a redirect page. Wait for the app to download.
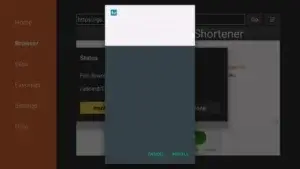
Step 6
Click Install.
Step 7
You will then encounter TiviMate Ready to go! message. Click to open the app.
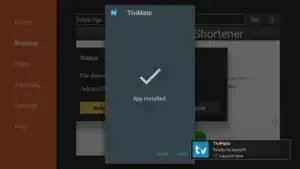
The installation is now complete. Enjoy!
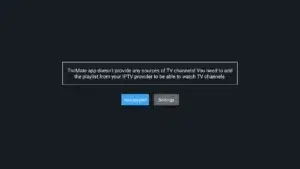
How to set up TiviMate
Step 1
Open the TiviMate app and click Add Playlist.
Step 2
Open the app
Go directly to add playlist and choose the Xtream Codes login function.
Step 3
Add Xtreme Codes
- Server address : http://line.testtest.80
- Username : XXXXX
- Password : XXXXX
- Check include VOD
Press next and the playlist will be uploaded to TiviMate.
Step 4
Load playlist
The app indicates exactly how many channels, VOD and films you have received. Press next and the playlist will appear within 30 sec.


Note : A TiviMate premium account is required for some functions (TV guide, zapping, playing movies and series). The costs can be found within the app.
Can't quite figure it out? Please feel free to contact us.
This tutorial will help you to get a better understanding on how to watch IPTV on your STB Emulator. The following Set-top boxes are compatible with it. 'STB Emulator' can emulate the following IPTV set-top boxes :
- MAG 200
- MAG 245
- MAG 250
- MAG 260
- MAG 270
- MAG 275
- Aura HD
- Visit Google Play Store and download STB Emulator.
- Install STB Emulator and open it. You will see a section called Mac Address.
- Click on "Settings", located near the top right-hand corner.
- Visit Profiles.
- Click on Test Portal. Then click "Add Profile".
- Click on "STB Model".
- Select your STB Model.
- Go to Portal Settings.
- Enter the Portal Email, which should have come to your email inbox.
- Select Screen Resolution.
- Pick 1280 x 720.
- Exit the app and restart it.
- You can now see the list of channels.
MAG 250 / MAG 254 and MAG 256
Connect your MAG Device to internet and television, then follow the steps below :
- Navigate to Settings > System Settings > Servers > Portals.
- Set IPTV Palace as Portal 1.
- Enter the URL from your email in the Portal 1 URL section.
- Leave Portal 2 name and URL empty.
Now you will be able to see the list of channels.
Configuring on Kodi Version 16 or lower
- Open Kodi.
- Click on System.
- Click on TV.
- Click on General.
- Select Enabled (a pop-up will appear saying you don't have a PVR client enabled).
- Select OK.
- Come down and click on PVR IPTV Simple Client.
- Click Enable.
- Click Configure.
- Add the M3U playlist URL that you have.
- Select OK.
- Select OK one more time.
- Restart Kodi.
- You will now see TV on the home screen. Click on it to see the list of live TV channels.
Can't quite figure it out? Please feel free to contact us.
Android Smartphone / Tablet
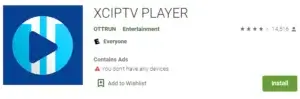
How to Install XCIPTV Player on Android Devices
Step 1
Unlock your Android device and go to Play Store (Google Play).
Step 2
Browse for XCIPTV Player in Google Play Store.
Step 3
Select Install to install XCIPTV Player on your Android device.
Step 4
Launch the IPTV player.

Step 5
You have successfully installed XCIPTV APK on your device! Enter your IPTV service credentials and click Sign Up when done.
Step 6
Done! Enjoy.
Can't quite figure it out? Please feel free to contact us.
Formuler Z box (MyTVOnline3)
MyTVOnline 3 is available for Formuler Z11 Pro Max and later versions and is quite easy to use.
Step 1
First, select the MyTvOnline 3 app.
There are three ways to use this app, but the best practice is to use xtream codes which we will explain in this tutorial.
Note : To use MyTvOnline 3 you need an IPTV subscription. You can see the prices and inquire about the service by
clicking here.
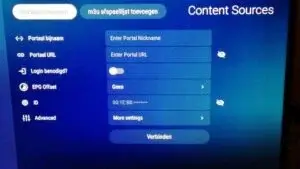
Step 2
You will see a window where you must enter the following info :
- Portal Name : Give it an optional name
- Portal URL : To be prepared by the IPTV service provider
- Login required : Enable this section (username and password fields will appear)
- Username and Password : Must be provided by the IPTV provider
Click on "Connect".
Can't quite figure it out? Please feel free to contact us.
This tutorial will guide you through a simple and effective installation step for your Mag (250/254/256…).
Step 1
When the box loads, the main portal screen appears. Click on "Settings" and press the "SETUP/SET" button on the remote control.
Step 2
Press "System Settings" and click "Servers".
Step 3
Click on 'Servers'.
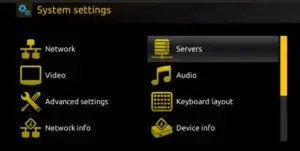
Step 4
Choose and press option 'Portals'.
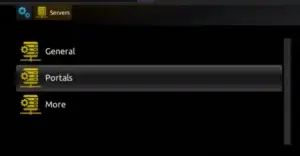
Step 5
Enter a portal name in the 'Portal 1 name' line and the portal URL in 'Portal 1 URL'.
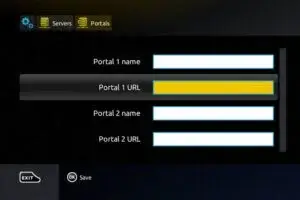
Important : For the activation of our IPTV subscription on your MAG box, you must send us the MAC address on the label behind the box with your order. The activation is completely remote — just after activation we will send you a URL link to set up your PORTAL.
Step 6
When done, select and click 'OK' to save the changes.
Step 7
Click 'EXIT' on the remote control after saving the settings.
Step 8
Reboot the box. Select the "OK" option to apply the changes.
Can't quite figure it out? Please feel free to contact us.
HOW IT WORKS
Step 1
- For Windows : Download .exe and install the IPTV Smarters Pro application
- For Mac : Download .dmg and install the IPTV Smarters Pro application
Step 2
Login to the application with your subscription details (get details from your service provider).
Note : Premium version features are not available for Windows / Mac.
Can't quite figure it out? Please feel free to contact us.
Here are the setup instructions for Openbox :
- Open up an Internet browser.
- Enter the M3U URL on it.
- You will be asked to save a file. Click on Save as and add any name.
- Copy the file to a USB flash drive. Then connect the USB flash drive to Openbox.
- Take the remote controller and follow these steps :
- Go to Menu
- Go to Network local settings
- Go to Network App
- Go to IPTV Palace
- Press Yellow Button to read from the USB drive
- You will see success displayed on Openbox.
If you still have any issues, simply restart your Wi-Fi router and Openbox.
Can't quite figure it out? Please feel free to contact us.
KODI (XBMC) Version 17 & Up
We will show you how to set up the IPTV using Kodi Krypton 17 :
- Launch the Kodi app.
- In the left menu, click on TV.
- Click on Add-on browser.
- Click on PVR IPTV Simple Client.
- Click on Configure.
- Select General.
- Enter the M3U IPTV subscription URL that you have copied.
- Click on the playlist URL entering option.
- Enter the URL of the playlist.
- If you have the M3U file stored locally, define the location to local path.
- Click on M3U playlist URL.
- Visit the location where the file is stored and click on it.
- Click OK.
- Wait for the notifications to load.
- Come back — it will look similar to the live TV interface. Enjoy!
Can't quite figure it out? Please feel free to contact us.
Use IPTV Smarters Channel
- Ensure connecting your TV and your Roku device together.
- Navigate through the Roku Channels store.
- Look for IPTV Smarters Channel and download it.
- Open the IPTV Smarters Channel.
- It will ask you to add your username, password and Portal URL (info provided when you purchase IPTV).
- After inserting the required information, click on add user.
- Your Favorite TV Channels and Video On Demand will load and you can start watching.
Use M3U Playlist Player Channel
- Ensure that your Roku device is connected to your TV.
- Navigate through the Roku Channels store.
- Search for M3U Playlist Player Channel and download it.
- Launch the M3U Playlist Channel.
- Click on Add new playlist.
- Insert your IPTV M3U link and any playlist name.
- It might take a few minutes for your playlist (Live TV, Movies, TV Shows) to load.
- After loading, turn off your Roku device and turn it back on again.
- Reopen the M3U Playlist Player Channel.
- Choose the IPTV playlist that you created before.
- Find and watch your favorite Live TV Channels and VOD.
Can't quite figure it out? Please feel free to contact us.
Dreamlink T1 / T1+ / T2 and T6
Here are the steps to complete configuration on Dreamlink T1 / T1+ / T2 and T6 :
- Take the MAC address of the device.
- Wait until the STB boots up.
- Finish the update that you can see.
- You will come to the Server Menu.
- Click on Exit button and select OK.
- You will get the main DOL screen where you can see the MAC address.
Instructions to configure on T1 / T1+ / T2 and T6
- When you get to DreamlinkOn Line, navigate to settings.
- Click on the Green Button in your remote and navigate to "Edit".
- Add a name for "Portal Name".
- Add the URL in your activation email to "Portal URL".
- Confirm and press OK.
- Now you will be able to start watching.
If you notice any issue, simply restart your Wi-Fi Router and Dreamlink.
Can't quite figure it out? Please feel free to contact us.